Tips & Tricks
Mai multe subdomenii in localhost folosind XAMPP
Acesta este un ghid prin care se creeaza subdomenii multiple în localhost folosind XAMPP.
Să începem
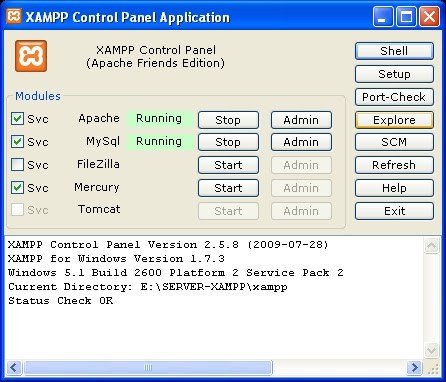
Deschideți panoul de control al XAMPP și faceți clic pe explorer. Acest lucru vă va duce la directorul de instalare XAMPP
Acum du-te la Apache > Conf > Extra apoi localizați și deschideți " httpd-vhosts.conf " fișier. NOTĂ:. Creați o copie de siguranță a fișierului înainte de a-l edita.
Eu folosesc notedpad + + ca software de editare.
Cron Jobs
Mi-am tot batut capul cum sa fac backup automat la baza de date intr-un interval stabilit de timp. Pana acum am folosit plugin-uri in Joomla care faceau acest lucru dar am avut ceva probleme si am cautat in continuare alta solutie. Asa am ajuns sa folosesc functia "cron jobs" din interfata CPanel.
Pentru backup-ul unei baze de date am folosit linia de comanda de mai jos:
mysqldump --opt -uUSER -pPAROLA NUME_BAZA_DE_DATE > FOLDER/`date -I`_NUME_FISIER.sql
`date -I` - creaza data curenta
In cazul in care baza de date nu se afla pe localhost si este pe un alt domeniu se foloseste linia de comanda de mai jos:
mysqldump --opt --host=HOST.COM -uUSER -pPAROLA NUME_BAZA_DE_DATE > FOLDER/`date -I`_NUME_FISIER.sql
In cazul in care vrei ca sa si arhivezi continutul am folosit lina de comanda care si sterge fisierul sql dupa arhivare:
gzip FOLDER/`date -I`_NUME_FISIER.sql
Surse:
https://stackoverflow.com/questions/8249948/cron-job-to-back-up-single-database-using-cpanel
https://forums.cpanel.net/f354/cron-job-back-up-sql-databases-regularly-26882.html
https://www.classicwebdesign.com/db_backup
https://www.rickhurst.co.uk/2005/12/23/mysqldump-of-remote-database-to-local-machine-command
https://stackoverflow.com/questions/2989724/how-to-mysqldump-remote-db-from-local-machine
Start-up intarziat
Pentru start intarziat a aplicatiior din start-up si nu numai mai jos se afla un script vbScript:
'Delay time 50 seconds
WScript.sleep 50000
Set WshShell = WScript.CreateObject("WScript.Shell")
'Google Trans
WshShell.Run "E:\prg\gDesktopTranslator_v1.0\gDesktopTranslator.exe"
WScript.Sleep 2000
'Skype
cmd_1 = chr(34) & "C:\Program Files\Skype\Phone\Skype.exe" & chr(34)
cmd_2 = "/nosplash /minimized"
skype_cmd = cmd_1 & " " & cmd_2
WshShell.Run skype_cmd, 1, True
Set WshShell = Nothing
WScript.Quit
Acest script l-am gasit pe stackoverflow.com si m-a ajutat sa-mi fac altul dupa cum urmeaza:
'Delay time 60 seconds
WScript.sleep 60000
Set WshShell = WScript.CreateObject("WScript.Shell")
'SkyDrive
cmd_1 = chr(34) & "C:\Users\root\AppData\Local\Microsoft\SkyDrive\SkyDrive.exe"
& chr(34)
cmd_2 = "/background"
skydrive_cmd = cmd_1 & " " & cmd_2
WshShell.Run skydrive_cmd
'Delay time 60 seconds
WScript.Sleep 60000
'BoxSync
cmd_3 = chr(34) & "C:\Program Files\Box Sync\BoxSync.exe" & chr(34)
cmd_4 = "-hidden"
boxsync_cmd = cmd_3 & " " & cmd_4
WshShell.Run boxsync_cmd
'Delay time 300 seconds
WScript.Sleep 300000
'Dropbox
cmd_5 = chr(34) & "C:\Users\root\AppData\Roaming\Dropbox\bin\Dropbox.exe" &
chr(34)
cmd_6 = "/systemstartup"
dropbox_cmd = cmd_5 & " " & cmd_6
WshShell.Run dropbox_cmd
'Delay time 300 seconds
WScript.Sleep 300000
Set WshShell = Nothing
WScript.Quit
Center Layers in Photoshop
Varianta in limba Romana (tradusa de Google).
Do you seem that some image is not exactly centered as you wish? Should be 5 pixels left or about 7 pixels upper? This short step-by-step procedure shows you how to center one layer in another by using Photoshop.
Before we start, I would like to focus your attention on the right upper History panel to follow all actions done by every single step. Also, don’t miss follow the Layers tab in the right lower corner to have an info which one is actually selected. Keep an eye on these two items all the time! They could significantly help you to clarify some doubts.
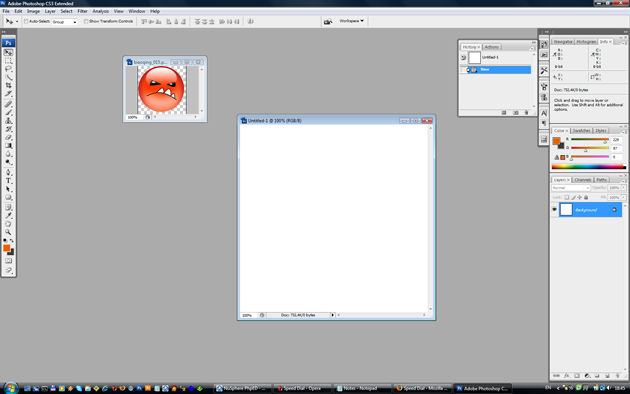
Well, let’s have a situation: very friendly and cute looking smiley should be exactly centered in the 500×500 pixels blank image. So, first open the smiley.png image and create new one, blank image by File > New selection of the top main menu. After this step #0, your workplace should look like the below one.

Now, make layer from Background of the newly created blank image by double click on it, in the right lower Layers tab. Check, that the name of this layer has changed from Background to Layer 0. Also, notice the History pane at right upper corner to check the change. This first step should be recorded there.
Soft Fade Vignette Effect in Photoshop

A
vignette, or soft fade, is a popular photo effect where the photo gradually fades into the background, usually in an oval shape. By using Photoshop's layer masks you can create this effect flexibly and non-destructively.
- Open a photo.
- Convert the background to a layer by double clicking on it. (Give it a name if you wish.)
- Select the Elliptical Marquee tool.
- Drag a marquee selection around the area of the photo you want to keep.
- Click the "Add layer mask" button at the bottom of the layers palette.
- Click on the layer mask thumbnail in the layers palette.
- Go to Filter > Blur > Gaussian Blur and make sure the Preview option is checked.
- Adjust the radius until you are happy with the amount of fade and click OK.
- Add a layer under the photo and fill it with the desired background.
More Articles...
- Cum se sincronizează timpul cu serviciul Windows Time în Windows XP
- F-number
- Cum sa fortezi sa muti orice aplicatie pe SD Card
- Tilt-Shift Photography Photoshop Tutorial
- True or False ?
- Despre intervalul dinamic
- Fotografia de produs la indemana oricui
- Cum fotografiem copiii
- Abrevieri in denumirea obiectivelor Nikkor
- Despre bracketing
Cautare
Tips & Tricks
- How to go back to a stock Android ROM on Samsung Galaxy S2
- Cron Jobs
- Start-up intarziat
- Soft Fade Vignette Effect in Photoshop
- Cum se sincronizează timpul cu serviciul Windows Time în Windows XP
- F-number
- Cum fotografiem copiii
- Abrevieri in denumirea obiectivelor Nikkor
- Fotografia sub 0 grade
- Despre balansul de alb
- Preveniti scrierea pe stick-uri USB
- Cum se creaz o unitate virtuala
Meniu principal
Aboneaza-te
- Acasa
- Tips & Tricks
